Good Morning. Some of you may have noticed I published a post on Saturday. Well, it wasn't supposed to happen like that. As I'm in the process of actually publishing to Kindle now, my brain is getting fried and the simplest tasks (like remembering a date, go bye-bye.) So before I forget all these, I'm going to share a few more tips with you on how to publish to Kindle.
Now these are after you've done all your formatting on your word.doc correctly, reviewed the manuscript, and are ready to upload to the Kindle process.
1) Be sure to read all the Kindle "Help" pages before you even start.
2) Make sure you have a "small" and a "large" cover. Your cover designer should already know this. You need the small one for the thumbnail print (where it says "upload your cover" (I believe this is step 9 on the first page). My small cover was around 250 x 350 pixels. The large should be at least 700 x 1200 pixels. (This is when you upload it for the book itself.)
3) Also, download the MobiPocket Creator and the Kindle Previewer (not Kindle for PC but the Previewer) before you begin the process. It will save you boatloads of time and aggravation. (They take a few minutes to do therefore should be done beforehand because once you get started on publishing the book, you really don't want to take time out to wait for downloads.) You can get the Kindle Previewer if you go to Amazon and plug that into their search engine. The page pops up and you have to scroll down to find it, but it's there. I believe you can get the MobiPocket Creator just by googling that.
Okay, and this next step was hard for me, I had to do it three times before I did it correctly so I suggest you pay attention. (Because I didn't read what I was supposed to read first.)
4) Before you can upload to the MobiPocket Creator you have to save your word.doc to HTML format. Click on File > Save > Web Page > (a box appears) click Web Page, Filtered. (A box will appear that says "Saving this material you may lose information." Ignore it and continue. Trust me. It will save you the panic. And three different uploads.) Now also make sure the name of the file is the title of the book. (Because I didn't and the whole thing got so messed up.) Click Save and it should appear in your files as an HTML doc.
When you upload to the MobiPocket, these steps are very straightforward and if you've done everything correctly, it should "Build" your book in record time. Also if you've already downloaded the Kindle Previewer, you can see what it will look like before you hit "Save and Publish". Don't get all freaked out if you don't see the page breaks, they don't show up. And the cover will be in black and white. If everything looks normal, you're good to go.
5) Also, another important thing to remember, when you're writing any of the information on Page 1, Title, Description, Contributors, etc. there are two little boxes in the bottom right hand corner of the page. One says Save as Draft, the other, Save and Publish. DO NOT TOUCH the Save and Publish key until you have filled everything out, looked at the book, and are really ready to go to page two. While you're writing your stuff, and filling out your fields, hit Save As Draft after every field. Especially the Description. I didn't realize you should because I blinked and it was all gone. Three times. Yeah, learn something from my mistakes. It'll save you a sleepless night and a migraine.
6)Make sure you take a good look at the Pricing and Royalty page. If I read it correctly, you can only get 70% on certain countries. Austria, Canada, Germany, Liechtenstein, Luxembourg, Switzerland, United Kingdom (also check Guernsey, Jersey, Isle of Man), United States. *Belium, *France, *Monaco (***As of late October). You'll have to check off each of these countries separately. If you're only doing the 35% you can hit World Wide Territories. And also, that has to do with your price point. It's the difference between 99 cents and $2.99. If you hit World Wide Territories on a $2.99 book, you'll only get 35% royalties. (That's if I read it correctly.) Which is why you need to put in the single countries themselves for the 70% royalty rate. (Math is so not my strong suit so if anyone knows any different, please jump right in and let me know.)
7) Now this last thing should be a no brainer, but for me, it was late and I was crazed from doing all the downloads. When you find the field that says "Contributors" put your name there as author. I didn't and I got a nice letter informing me I had only listed the illustrators. So don't forget about you. (And by the way, they don't have a listing for "Cover Designer" so I used "Illustrator".)
And so, I think that's that for all my fumbles and bumbles along the way. I have some more tid-bits of information to share, but you'll have to wait for next time. Hope these help. And if anyone has any other input to share, PLEASE feel free to jump in in the comments. I am no expert.
Showing posts with label Format Your Manuscript to Kindle. Show all posts
Showing posts with label Format Your Manuscript to Kindle. Show all posts
Monday, October 3, 2011

Wednesday, September 14, 2011
How to Format for Kindle Part II
Last week I set about to show you How To Format Your Manuscript for Kindle and Agents. I talked about the right formatting tricks on your computer to get your manuscript in professional order. This week, I'm giving you links. (Because quite frankly the task is so daunting I couldn't do it.)
Here is a link for a checklist posted by April L. Hamilton on what you need to do for uploading to Kindle.
Also, my friend and Primary Reader, J.Bridget Chicoine, has also posted two important posts on formatting, and I would like to highlight those as well. Anything that makes writing easier should be looked at.
The first post shows you, with simple step by step instructions, ways to improve how you navigate through your manuscript. In revisions I'm sure you'd all love to be able to find just exactly what you're looking for without going through tons of notes written on scrap paper (like I do).
The second post shows how you can format your scene headers, which then allows them to automatically appear in the correct order. (And let me tell you how many Chapter Fourteens I had for one manuscript.) **** This is a godsend, I suggest you memorize this, as at some point you will need to use this tool when you have to upload a hyperlinked table of contents.
Hope you take a moment and give these links a look- see.
Here is a link for a checklist posted by April L. Hamilton on what you need to do for uploading to Kindle.
Also, my friend and Primary Reader, J.Bridget Chicoine, has also posted two important posts on formatting, and I would like to highlight those as well. Anything that makes writing easier should be looked at.
The first post shows you, with simple step by step instructions, ways to improve how you navigate through your manuscript. In revisions I'm sure you'd all love to be able to find just exactly what you're looking for without going through tons of notes written on scrap paper (like I do).
The second post shows how you can format your scene headers, which then allows them to automatically appear in the correct order. (And let me tell you how many Chapter Fourteens I had for one manuscript.) **** This is a godsend, I suggest you memorize this, as at some point you will need to use this tool when you have to upload a hyperlinked table of contents.
Hope you take a moment and give these links a look- see.
Wednesday, September 7, 2011
How to Format Your Manuscript for Kindle or Agents
Good Morning Everyone. Over the course of the last few weeks, I’ve gotten a ton of questions on how to reformat manuscripts for the Kindle. As I know most agents also read partial and full requests on their Kindle, this might be good for some of you as well. With the help of my critique partner, Mac Wheeler, I’ve tried to give step-by-step instructions, but if you have any questions, I’ll be around most of the day. And if anyone else has anything they’d like to add, please feel free in the comments.
And this if for Word docs only. If you use anything else, I’m sorry I can’t help you.
First up, you really need to be friends with your menus and toolbars. (And I know most of you are already familiar with yours, however, some of us who aren’t computer literate had no idea what a plethora of treasures could be found there. Believe me when I tell you, knowing what these do make life a whole lot easier.)
File Edit View Insert Format Tools Table Window Help
or if you're using Word 2007:
Home Insert Page Layout References Mailings Review View
Second, I absolutely can’t stress enough to try this on your ‘scrap’ files first.
I did at least four of mine before I tried it with a completed ms.
And please don’t panic. You can always undo any changes you make with
Click Edit > Undo.
Okay, here we go. You have to be in Print Version to do these changes.
View> Print Version
Word 2007: Views > Document Views > Print Layout
1) MARGINS Change margins to 1" all around, top bottom left side right side --
File>Page Set-up> In each box manually change the number to 1”> click on Portrait (not Landscape) picture> click OK
Word 2007: Page Layout > Page Set up > Margins > click Normal
2) PAGE NUMBERS Move page numbers to top right hand corner. (For agents, you will have a header anyway with your name and title – When reformatting for Kindle, you will remove the header and page numbers. Word doc. automatically gives you 0.5 header and footer when you remove the information stored there. Which is fine.)
3) PAGE BREAKS Insert page breaks TWO carriage returns after end of sentence (Kindle required)
Insert> Break> A little box appears. Click OK.
Word 2007: Insert > Pages > click Page Breaks (or simply: Ctrl + Enter)
Now, inserting a page break into an already existing document, you will find beginning on the next page there may be white space. What you have to do is delete that white space until the Chapter heading falls at the top of the page. Sometimes you may find that you’ve accidentally deleted the page break.
To check this go to View> Normal Layout. (Word 2007: View > Print Layout)
You will see if the page break is there or not. If not, Just re-insert the page break.
As an aside, if you have two carriage returns for a scene change or POV change that's fine, they will show up where they are supposed to. Page breaks are only for end of chapter stops.
4) TABS This is the biggest issue with Kindle formatting that I have found. Hopefully you never used the tab key to create paragraph indents (like me). If you did, you must remove all of these manual tabs. In HTML they are considered characters (like letters in the alphabet.) There is an easy way to do that in Replace All:
Ctrl + H > select the "more" button > position cursor on Find what > select Special button > click "Tab" > leave "Replace with" empty > click Replace All
We can now Reset Tabs with the RULER… View > Ruler
Word 2007: View > Show Hide > check the “Ruler” box )
Step 1: Select all text from very the first paragraph to the end of the document. To do that, “set your insertion point,” that is, click before the first word of first paragraph. Hold down Shift + Ctrl and press END—This selects to end of the document
Step 2: In the upper left hand corner of the ruler, there is a tiny box, with a tiny black line, click on the box until a downward point is shown. Now you drag the “First Line Indent,” which you find on your ruler, to the width you wish to set your paragraph indents.
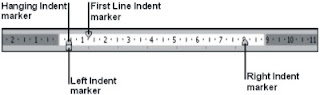
Set the indent to half an inch.
Step 3: It’s best to now go to every line through your entire document that isn’t a full paragraph of text, which you want centered, like chapter headings and scene break characters (if used), and reset the tab to zero.
(And now, the easiest way to center is a keyboard shortcut
- Position your cursor on the line you want centered
- Hold down Ctrl and press the “E” key (Ctrl + E))
Now you have set automatic tabs throughout your document. Every time you hit ENTER for a new paragraph, the new paragraph is automatically indented.
5) JUSTIFICATION. Where the right side of the document falls in line to flat edges, which is what normal books do.
Format>Styles & Formatting AA> (The sidebar will come up) In the sidebar find Normal click Normal> (Another box will appear) Click Modify> click the picture of the justify all button> Click Automatically Update at the bottom> click ok
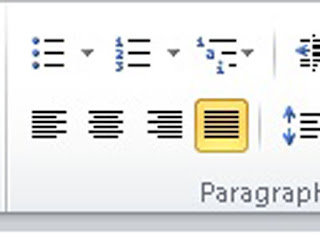
Unfortunately, you’ll have to go through your manuscript again to find the white space between words. You’ll need to delete the white space to allow the sentence structure to realign itself. As an aside, I use the backspace key to delete the white space, it seems to work better for me than delete.
6) Change spacing between sentences. I’m old school and still use two spaces between sentences. To change these, always do this when the document is completely finished. That way you won’t have to do it repeatedly.
Edit> Replace > A box appears In Find What hit the space bar two times > In Replace hit the space bar one time > click Replace All
As an aside, after this step, you’ll have to click on one of the little green lines that appear between your sentences to get rid of them. Click Tools > Spelling and Grammar > A box will appear click Ignore Rule > Close. That should fix it. Now if you add anything more to the doc. you’ll have to repeat this step.
7) Change the Font. I keep my font on Times New Roman because I don’t like any of the others for my historical romances. However, for my contemporaries I’m more inclined to use Sans Serif. It looks more modern.
Format > Styles & Formatting AA > (The sidebar will come up) In the sidebar find Normal click Normal > (Another box will appear) Click Modify > Click Format > (Another box will appear) Click Font > (Another box will appear) Click whichever font you want to use from the drop down menu – (remember to change the pt. type as well – I use Times New Roman regular 12 pt – If I wanted to change this I would use Serif regular 10 pt.) Click OK > the first box will reappear make sure Automatically Update is checked off > Click OK
8) Em-dash. I have also heard that the em-dash really messes with the Kindle format. I need to check this out. So, I have changed all mine to ellipses. I suppose you could use two hyphens to form an em-dash, however, in dialogue you can’t get the close quotation marks to align the right way, hence, ellipses. When I have more on this I will let you know.
9) Special Characters. I’ve always used the **** to separate scenes because I had no idea there were so many other characters to choose from. I am particularly fond of this one .(Which does not show up from Word.) However, much to my consternation, Kindle cannot read them. (And obviously neither can Blogger.) So I suggest if you have anything other than **** or #### in your manuscript, remove them and reinsert these good old mainstays.
10) LINE SPACING Line spacing is 1.5 for Kindle ms. Even with agents who read on Kindle.
Format > Paragraph > Line Spacing - 1.5 click OK
**********
Doing all this to a ms. takes a lot of patience, and trial and error (for me). Just breathe, and remember before you throw your computer through the window, close the doc. down, and walk away.
Also, on your tool bar there is Help. Just type in what you need help with and the answer magically appears. Which is what I did quite a few times.
And you may ask, why all the steps? And I will tell you, because this is how I learned to do them. I'm sure there are many tasks that may be done at the same time, but I'm a chef by trade and sometimes you can't add all the ingredients together or you end up with a mess.
And that’s that. Whew. I know this seems like a lot of work, but once you try it and see the results, you’ll say, “Wow, this looks like a professional document.” I know I did.
Questions???
PS My Readability Statistics for this
Flesch Reading Ease 73.0
Flesch-Kincaid Grade Level 6.4.
And this if for Word docs only. If you use anything else, I’m sorry I can’t help you.
First up, you really need to be friends with your menus and toolbars. (And I know most of you are already familiar with yours, however, some of us who aren’t computer literate had no idea what a plethora of treasures could be found there. Believe me when I tell you, knowing what these do make life a whole lot easier.)
File Edit View Insert Format Tools Table Window Help
or if you're using Word 2007:
Home Insert Page Layout References Mailings Review View
Second, I absolutely can’t stress enough to try this on your ‘scrap’ files first.
I did at least four of mine before I tried it with a completed ms.
And please don’t panic. You can always undo any changes you make with
Click Edit > Undo.
Okay, here we go. You have to be in Print Version to do these changes.
View> Print Version
Word 2007: Views > Document Views > Print Layout
1) MARGINS Change margins to 1" all around, top bottom left side right side --
File>Page Set-up> In each box manually change the number to 1”> click on Portrait (not Landscape) picture> click OK
Word 2007: Page Layout > Page Set up > Margins > click Normal
2) PAGE NUMBERS Move page numbers to top right hand corner. (For agents, you will have a header anyway with your name and title – When reformatting for Kindle, you will remove the header and page numbers. Word doc. automatically gives you 0.5 header and footer when you remove the information stored there. Which is fine.)
3) PAGE BREAKS Insert page breaks TWO carriage returns after end of sentence (Kindle required)
Insert> Break> A little box appears. Click OK.
Word 2007: Insert > Pages > click Page Breaks (or simply: Ctrl + Enter)
Now, inserting a page break into an already existing document, you will find beginning on the next page there may be white space. What you have to do is delete that white space until the Chapter heading falls at the top of the page. Sometimes you may find that you’ve accidentally deleted the page break.
To check this go to View> Normal Layout. (Word 2007: View > Print Layout)
You will see if the page break is there or not. If not, Just re-insert the page break.
As an aside, if you have two carriage returns for a scene change or POV change that's fine, they will show up where they are supposed to. Page breaks are only for end of chapter stops.
4) TABS This is the biggest issue with Kindle formatting that I have found. Hopefully you never used the tab key to create paragraph indents (like me). If you did, you must remove all of these manual tabs. In HTML they are considered characters (like letters in the alphabet.) There is an easy way to do that in Replace All:
Ctrl + H > select the "more" button > position cursor on Find what > select Special button > click "Tab" > leave "Replace with" empty > click Replace All
We can now Reset Tabs with the RULER… View > Ruler
Word 2007: View > Show Hide > check the “Ruler” box )
Step 1: Select all text from very the first paragraph to the end of the document. To do that, “set your insertion point,” that is, click before the first word of first paragraph. Hold down Shift + Ctrl and press END—This selects to end of the document
Step 2: In the upper left hand corner of the ruler, there is a tiny box, with a tiny black line, click on the box until a downward point is shown. Now you drag the “First Line Indent,” which you find on your ruler, to the width you wish to set your paragraph indents.

Set the indent to half an inch.
Step 3: It’s best to now go to every line through your entire document that isn’t a full paragraph of text, which you want centered, like chapter headings and scene break characters (if used), and reset the tab to zero.
(And now, the easiest way to center is a keyboard shortcut
- Position your cursor on the line you want centered
- Hold down Ctrl and press the “E” key (Ctrl + E))
Now you have set automatic tabs throughout your document. Every time you hit ENTER for a new paragraph, the new paragraph is automatically indented.
5) JUSTIFICATION. Where the right side of the document falls in line to flat edges, which is what normal books do.
Format>Styles & Formatting AA> (The sidebar will come up) In the sidebar find Normal click Normal> (Another box will appear) Click Modify> click the picture of the justify all button> Click Automatically Update at the bottom> click ok

Unfortunately, you’ll have to go through your manuscript again to find the white space between words. You’ll need to delete the white space to allow the sentence structure to realign itself. As an aside, I use the backspace key to delete the white space, it seems to work better for me than delete.
6) Change spacing between sentences. I’m old school and still use two spaces between sentences. To change these, always do this when the document is completely finished. That way you won’t have to do it repeatedly.
Edit> Replace > A box appears In Find What hit the space bar two times > In Replace hit the space bar one time > click Replace All
As an aside, after this step, you’ll have to click on one of the little green lines that appear between your sentences to get rid of them. Click Tools > Spelling and Grammar > A box will appear click Ignore Rule > Close. That should fix it. Now if you add anything more to the doc. you’ll have to repeat this step.
7) Change the Font. I keep my font on Times New Roman because I don’t like any of the others for my historical romances. However, for my contemporaries I’m more inclined to use Sans Serif. It looks more modern.
Format > Styles & Formatting AA > (The sidebar will come up) In the sidebar find Normal click Normal > (Another box will appear) Click Modify > Click Format > (Another box will appear) Click Font > (Another box will appear) Click whichever font you want to use from the drop down menu – (remember to change the pt. type as well – I use Times New Roman regular 12 pt – If I wanted to change this I would use Serif regular 10 pt.) Click OK > the first box will reappear make sure Automatically Update is checked off > Click OK
8) Em-dash. I have also heard that the em-dash really messes with the Kindle format. I need to check this out. So, I have changed all mine to ellipses. I suppose you could use two hyphens to form an em-dash, however, in dialogue you can’t get the close quotation marks to align the right way, hence, ellipses. When I have more on this I will let you know.
9) Special Characters. I’ve always used the **** to separate scenes because I had no idea there were so many other characters to choose from. I am particularly fond of this one .(Which does not show up from Word.) However, much to my consternation, Kindle cannot read them. (And obviously neither can Blogger.) So I suggest if you have anything other than **** or #### in your manuscript, remove them and reinsert these good old mainstays.
10) LINE SPACING Line spacing is 1.5 for Kindle ms. Even with agents who read on Kindle.
Format > Paragraph > Line Spacing - 1.5 click OK
**********
Doing all this to a ms. takes a lot of patience, and trial and error (for me). Just breathe, and remember before you throw your computer through the window, close the doc. down, and walk away.
Also, on your tool bar there is Help. Just type in what you need help with and the answer magically appears. Which is what I did quite a few times.
And you may ask, why all the steps? And I will tell you, because this is how I learned to do them. I'm sure there are many tasks that may be done at the same time, but I'm a chef by trade and sometimes you can't add all the ingredients together or you end up with a mess.
And that’s that. Whew. I know this seems like a lot of work, but once you try it and see the results, you’ll say, “Wow, this looks like a professional document.” I know I did.
Questions???
PS My Readability Statistics for this
Flesch Reading Ease 73.0
Flesch-Kincaid Grade Level 6.4.
Subscribe to:
Posts (Atom)